Updates before I dive in (skip to next section for Gitlab)
Unfortunately, life has gotten in the way over the last year, what with COVID pushing my team to the limits at work and crazy amounts of project engineering coming front and center instead of personal projects. The homelab has morphed several times, and now we’re at the following layout:
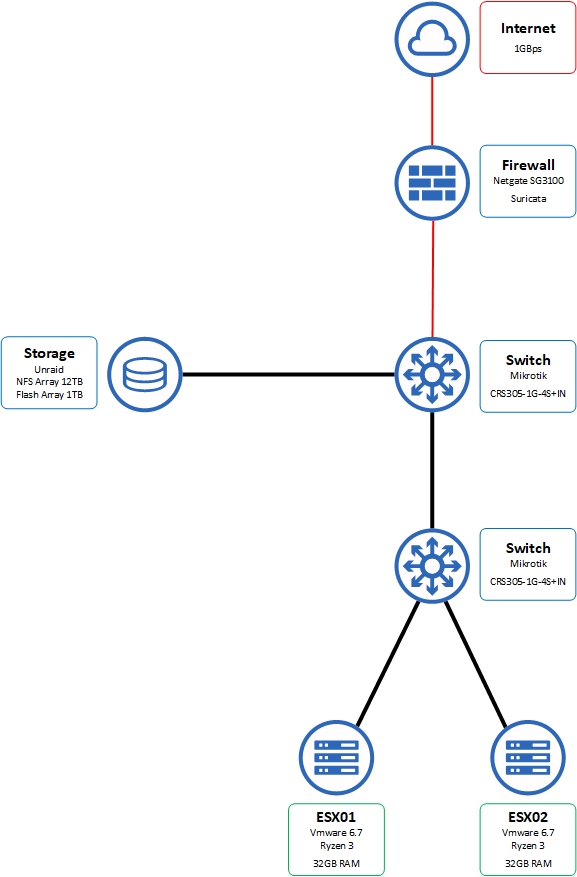
I’ve finally moved the lab to 10GBps switching, and since I don’t have networks I need to route to above 1GB/s I probably won’t swap the 3100 for now.
Docker has been a great addition to work and the lab—in some ways it has massively simplified my workflow as you will see later. I began with using Unraid natively to manage containers (and still use it), Portainer to manage headless deployments, then Docker-Compose for managing stacks when it turned out Portainer does a poor job of that (unless your poor business bought in to Swarm). Kubernetes just isn’t useful for my work or my lab, so I spend minimal time with it and usually use K3s/Rancher when I do.
I built two custom Ryzen-based hosts with ESX 6.7 using the developer license I’ve written about before. They have performed well, with most things working out of the box and only having to slipstream a Realtek driver in for the motherboard-based gigabit NIC’s. The 10gb SFP+ card worked natively.
I had a need to have some testing done on this blog, and I always wanted to have a staged CI/CD for it as a learning experience. This post will cover the process of migrating my pet-style website with one-off configurations not backed up anywhere, to a cattle-style deployment structure.
Gitlab CI/CD
Gitlab Community Edition is a free, open source, self-hosted code management server with an Enterprise touch that even Github doesn’t quite manage yet. It has an incredible featureset in the base CE version, but I will be focusing on the CI/CD parts here. I will assume you have a working Gitlab with your code locally stored.
High-level Plan
We are going to: * Install a Runner to run our code tests
-
Fix certificate issues on Gitlab runners
-
Build a basic gitlab-ci.yml file for automated testing
-
Deploy to Test
-
Deploy to Prod
You will need: * A working Gitlab instance with a repository for your code
-
A Certificate Authority. If you have no other options, PFSense has a built-in one that works well
-
A “Test” server. For me, this was a blank CentOS linux box that I took a vmware snapshot of before testing. I will call it ti-test.ti.local
-
A “Prod” server. Can just be another local server or a cloud server, in my case a DigitalOcean droplet. I will call it teamignition.us
Install a Gitlab Runner
Runners are the basis of what makes this work. It’s a service which ties to your Gitlab server and waits for instructions—in this case it will be running Docker images and code that Gitlab pushes to it. To set up a Gitlab Runner, click here and follow the Linux instructions—make a Shared Runner with the docker executor when it asks. I know it says not to, but you can install it on the Gitlab server just fine (I made three because I sometimes run three jobs simultaneously!).
If you run into certificate issues, see the next section.
Certificates
I ran into an error that drove me nuts for a while. Gitlab assumes you’re using an enterprise CA and both your server and runners have part of that chain attached. Their instructions here do explain the issue, but if you see the error runner gitlab x509: certificate signed by unknown authority this is how you fix it:
Download a copy of the signing CA. In the pfsense deployment I mentioned above, you can grab the public key for your root CA by going to System > Cert Manager > CAs and hitting the Export CA star on the right. Install it to your server—for CentOS, copy the files to /etc/pki/ca-trust/source/anchors/ and run update-ca-trust to install it.
Now, generate a server certificate (same place above, Certificates tab for pfsense), export the cert and the key, copy them to /etc/gitlab/ssl/ and restart Gitlab’s services to switch the certificate. If your runner is on another box, add the root CA to it as well. Now, your certificate errors when making a runner should be gone!
The .gitlab-ci.yml File
The code for these looks cumbersome, but after spending hours tweaking my Ansible deployment and fixing yaml spacing it turns out they’re pretty easy.
Here’s the completed product so you can get an idea of what we’re working with:
image: geerlingguy/docker-centos7-ansible:testing

before_script:
  - export ANSIBLE_VAULT_PASSWORD_FILE=.vault_pass
  - export VAULT_PASSWORD=PASSWORD

stages:
  - Test Ansible Linting
  - Deploy to Testing
  - Deploy to Prod

Ansible Linting:
  stage: Test Ansible Linting
  script:
    - 'yamllint -d "{extends: relaxed, rules: {line-length: {max: 120}}}" .'

Ansible Deploy to Test:
  stage: Deploy to Testing
  script:
    - 'yum install sshpass -y'
    - 'ansible-galaxy install geerlingguy.certbot geerlingguy.nginx geerlingguy.firewall'
    - 'ANSIBLE_HOST_KEY_CHECKING=False ansible-playbook -i inventory.ini prod_setup.yml --limit=ti-test.ti.local'
    - >
      ANSIBLE_HOST_KEY_CHECKING=False ansible-playbook -i inventory.ini prod_setup.yml --limit=ti-test.ti.local
      | grep -q 'failed=0'
      && (echo 'Idempotence test: pass' && exit 0)
      || (echo 'Idempotence test: fail' && exit 1)

    - 'ANSIBLE_HOST_KEY_CHECKING=False ansible-playbook -i inventory.ini prod_deploy_blog.yml --limit=ti-test.ti.local'

  only:
    - branches
  except:
    - master

Ansible Deploy to Server:
  stage: Deploy to Prod
  script:
    - 'yum install sshpass -y'
    - 'ansible-galaxy install geerlingguy.certbot geerlingguy.nginx geerlingguy.firewall'
    - 'ANSIBLE_HOST_KEY_CHECKING=False ansible-playbook -i inventory.ini prod_setup.yml --limit=teamignition.us'
    - 'ANSIBLE_HOST_KEY_CHECKING=False ansible-playbook -i inventory.ini prod_deploy_blog.yml --limit=teamignition.us'
  only:
    refs:
      - master
Let’s break that beast down. To keep you in the loop, I deploy the blog from a public github repository via Ansible playbooks/roles that I don’t currently have public.
image: geerlingguy/docker-centos7-ansible:testing
This is where you declare the Docker image to use for the tests. In this CI/CD path I am running the tests and deployment on my Ansible code, and the venerable Jeff Geerling has an awesome pre-built docker image called docker-centos7-ansible that has most everything I need!
You’ll notice I have the :testing branch selected, that version of this image has several linting and code testing tools installed already as well—so this image can both test and deploy.
before_script:
  - export ANSIBLE_VAULT_PASSWORD_FILE=.vault_pass
  - export VAULT_PASSWORD=PASSWORD
This is a hacky workaround for another issue I’ll write up another time. Ansible uses ansible-vault to natively encrypt values, like passwords or other private information. Those vaults need a password, and this docker environment doesn’t know what that password is. I pass it in as an environment variable in the container here, then Ansible runs the python script .vault_pass which loads the password:
#!/usr/bin/env python

import os
print os.environ['VAULT_PASSWORD']
I am looking for a better way to do this, please send ideas if you have them! Onwards.
stages:
  - Test Ansible Linting
  - Deploy to Testing
  - Deploy to Prod
This section defines the stages in your build. You can have multiple steps run during each stage, but only one stage runs at a time. In other scripts, I have all of my linting and formatting run in a single step and use up three runners simultaneously to speed the build up a bit. Please read the simple Gitlab primer on CI/CD to get a feel for how this works.
Ansible Linting:
  stage: Test Ansible Linting
  script:
    - 'yamllint -d "{extends: relaxed, rules: {line-length: {max: 120}}}" .'
In my first stage, I run a linting tool to make sure my Ansible YAML files are correctly formatted. Notice I call out the stage, so it knows where this step belongs. Normally I run this locally before pushing a change, but this catches when I forget and stops the CI/CD path from proceeding when it would be broken by bad YAML. I think the line length rule is a bit stingy so I extend it, but otherwise I force good YAML up front before doing anything else. You NEED to do this step even if you do nothing else with your CI/CD, it will make you produce better code!
Ansible Deploy to Test:
  stage: Deploy to Testing
  script:
    - 'yum install sshpass -y'
    - 'ansible-galaxy install geerlingguy.certbot geerlingguy.nginx geerlingguy.firewall'
    - 'ANSIBLE_HOST_KEY_CHECKING=False ansible-playbook -i inventory.ini prod_setup.yml --limit=ti-test.ti.local'
    - >
      ANSIBLE_HOST_KEY_CHECKING=False ansible-playbook -i inventory.ini prod_setup.yml --limit=ti-test.ti.local
      | grep -q 'failed=0'
      && (echo 'Idempotence test: pass' && exit 0)
      || (echo 'Idempotence test: fail' && exit 1)

    - 'ANSIBLE_HOST_KEY_CHECKING=False ansible-playbook -i inventory.ini prod_deploy_blog.yml --limit=ti-test.ti.local'

  only:
    - branches
  except:
    - master
Each line under the script header is a one-line command to run in the docker container’s local shell. First, in the container I have it install sshpass (no idea why it’s not in the base image).
Then, grab the relevant ansible roles which I make use of (thanks again Jeff!).
Next, I run the prod_setup playbook against my test host, which takes care of deploying the web server including certs and configs, sets up firewall rules, monitoring, etc, basically everything except pushing the website itself—I wanted to be able to run a much faster playbook every time I push a new page instead of redeploying the whole thing.
I run the same playbook a second time here—only for testing, this is a one-liner which will make sure that there is no changes, to test for idempotency. This lets me correctly control configuration drift because in the future, it only applies changes when something doesn’t match up correctly.
Finally, we deploy the blog using prod_deploy_blog. This reaches to git, grabs the latest master branch, pushes to the website and then runs the necessary Pelican tools to produce HTML since I hate doing it myself. This produces a very lean static site with no fancy code or animations, formatting nicely on mobile and requiring very little bandwidth.
Notice the Only: and Except: chunks. Only makes this step only run on git branches, and Except prevents it running on Master…this way, every branch I make (dev) except for the original master will push to test, but only the Master branch will automatically push to prod:
Ansible Deploy to Server:
  stage: Deploy to Prod
  script:
    - 'yum install sshpass -y'
    - 'ansible-galaxy install geerlingguy.certbot geerlingguy.nginx geerlingguy.firewall'
    - 'ANSIBLE_HOST_KEY_CHECKING=False ansible-playbook -i inventory.ini prod_setup.yml --limit=teamignition.us'
    - 'ANSIBLE_HOST_KEY_CHECKING=False ansible-playbook -i inventory.ini prod_deploy_blog.yml --limit=teamignition.us'
  only:
    refs:
      - master
Gitlab is intelligent enough to read this file and follow the instructions, only running relevant stages based on the branch names. I chose to do only “is master/is not master” but I’ve seen tagging and multi-branch designs that extend on this and work amazingly well.
And look! Now, when you push to your dev branch, it’ll pop up a copy on your test site and you can check it out (and run other tests against it if needed). Then, when you like it, push your changes to the Master branch and it’ll automatically deploy it to production!
Not bad. The hardest part was getting my Ansible playbooks to correctly provision a new server and deploy the website, where every single little step is important, and Gitlab thankfully makes it easy to run tests so I could do small changes and see instant results. Hopefully this is helpful to someone who will take it and make a CI/CD path for their lab or work projects, even if all it does is just a linting step!